
3-Соединитель конька крыши
The HESU 3-way roof ridge connector joins one main ridge and two hip runs on a synthetic resin tile roof. Also called a three-way ridge tile, its molded Y-shaped form covers the meeting point and continues the adjoining ridge profiles. Match it with the ridge and hip components for your selected roof tile system.
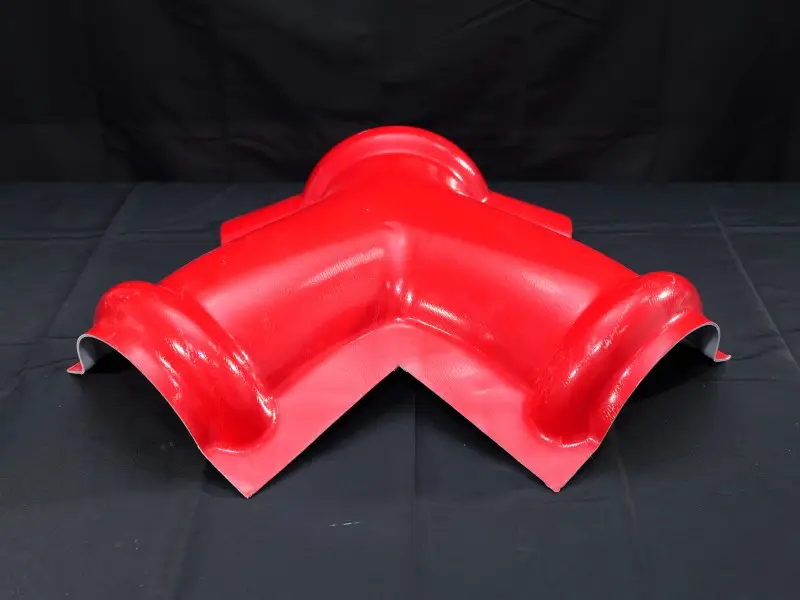
One junction. Three connected roof lines.
- Joins three ridge or hip directions at one roof junction.
- Continues the shape and color of a compatible resin ridge system.
- Reduces improvised cutting at a highly visible roof intersection.
- Works as one component alongside the main roof tile, ridge caps, модная плитка, поддерживает, крепежные детали, and flashing details.
The connector is not a universal cap and does not waterproof a junction by itself. Weather shedding depends on compatible profiles, correct overlaps, stable support, подходящие крепления, уклон крыши, and project-specific installation details.
3-way roof ridge connector specifications

| Тип продукта | Molded three-direction ridge junction accessory |
|---|---|
| Common names | 3-соединитель конька крыши, three-way ridge tile, Y-shaped ridge connector |
| Visible geometry | Three branches in a Y-shaped arrangement |
| Typical junction | One main ridge meeting two diagonal hip or sloping ridge lines |
| Roof system | Compatible synthetic resin or Spanish-style roof tile system |
| Profile fit | Not universal; the connector must match the adjoining HESU ridge and hip components |
| Color shown | Red; the project color should be coordinated with the selected main tile and ridge set |
| Dimensions and fixing | Profile-dependent; use the approved drawing and installation guidance for the selected system |
For dimensional matching, send the adjoining ridge profile and a roof-junction drawing. Include the branch directions and roof pitches: overall width alone does not establish whether all three outlets will seat correctly.
Where is a 3-way ridge connector used?
A 3-way ridge connector is used at the junction of a horizontal main ridge and two diagonal hips, or at another three-direction intersection defined by the roof drawing. This geometry is common on hipped villas, residential roofs, entrance canopies, pavilions, курорты, and other multi-slope roofs built with synthetic Spanish roof tiles.
The roof plan determines the component. A continuous roof peak needs ordinary resin roof ridge tiles; a diagonal line needs a compatible hip or sloping ridge tile; a central four-direction crossing needs a 4-соединитель конька крыши. The 3-way connector is reserved for a junction with three adjoining directions.
How the three roof lines meet
Main ridge branch
The upper branch connects with the ridge cap that follows the horizontal roof peak. Its centerline should remain aligned with the main ridge rather than being pulled sideways to compensate for an inaccurate hip line.
Two hip branches
The other branches transition into the two sloping ridge or hip runs. Both sides need consistent alignment, overlap direction, and support so the connector sits naturally instead of being twisted across the junction.
Junction support
The meeting point needs a stable fixing location beneath the connector. The approved support and fastener arrangement must suit the selected HESU profile and the local roof design.
Is this a Y-shaped or T-shaped ridge connector?
The HESU product has a Y-shaped three-way junction. Its branches spread toward one main ridge and two hip lines. Some roofing suppliers also use “three-way connector” for a T-shaped part where a secondary ridge meets the side of another ridge. Those two geometries are not interchangeable.
| Connector geometry | Typical roof relationship | Selection check |
|---|---|---|
| Y-shaped three-way connector | One main ridge meets two diagonal hips | Confirm all three branch angles against the hipped-roof drawing |
| T-shaped three-way connector | One secondary ridge meets another ridge at a T-junction | Confirm the perpendicular or project-specific intersection angle |
Use the roof drawing and a clear junction image to identify the required shape before checking profile and color. Calling both products “three-way” is not enough to establish compatibility.
Compatibility checks for a clean junction
| Check | Почему это важно | What to confirm |
|---|---|---|
| Геометрия крыши | Three branches must follow the actual ridge and hip directions. | Junction position, branch directions, уклон крыши, and symmetry from the roof drawing. |
| Main tile profile | Similar-looking resin tiles can use different wave spacing and step geometry. | Exact HESU tile profile and the accessory family made for it. |
| Adjoining ridge parts | The connector overlaps ridge and hip components, not only the main roof tile. | Ridge-cap shape, hip-tile shape, overlap orientation, and contact area. |
| Support and fixing | A molded connector should not bridge an unsupported junction or be pulled into position by screws. | Support location, approved fastener type, подготовка отверстия, and washer seating. |
| Color and surface | The junction remains visible near the highest roof lines. | Color reference and surface finish across the connector, ridge caps, модная плитка, and main tiles. |
| Weather detail | A connector is part of the water-shedding assembly, not a substitute for full junction design. | Перекрывать, flashing or closure requirements, prevailing weather exposure, and local installation guidance. |
Dimensions and fixing details vary by roof tile profile. The connector should therefore be matched to the selected roof system rather than chosen from appearance alone. The complete Spanish roof tile accessory system connects ridge, край, end and fastening components with the main tiles.
Installation coordination at the junction
- Confirm the roof intersection. Mark the main ridge and both hip centerlines from the roof drawing before positioning the accessory.
- Align the adjoining runs. Set out the main ridge and both hip runs together. Leave their junction ends accessible for a trial fit before final fastening.
- Dry-fit the connector. Check branch direction, overlap contact, clearance, цвет, and support location without forcing the molded part.
- Resolve a mismatch before fastening. If the connector rocks, twists, or leaves uneven contact, recheck the selected profile, roof angle, ridge alignment, and support height. Do not use screw pressure to reshape an incompatible part.
- Fix according to approved profile guidance. Use the specified fastener and washer arrangement, prepare holes as required for the resin system, and tighten evenly without distorting the connector.
- Inspect the complete junction. Check all three overlaps, exposed edges, fastener seating, and the intended water path before leaving the roof line.
Use the selected system’s fixing and overlap detail for the final assembly. For the relationship between caps, closures and drainage, see the ridge and roof-junction detailing guide.
Common fit problems and what they indicate
| Observed problem | Likely issue to check |
|---|---|
| One branch sits higher than the other two | Uneven ridge support, inconsistent hip alignment, or a junction angle that does not match the connector. |
| The connector must be twisted to touch all three ridge parts | Wrong accessory profile, inaccurate centerlines, or mismatched adjoining ridge components. |
| Visible gaps remain below a branch | Insufficient overlap contact, incompatible wave/step geometry, or missing project-specific closure detail. |
| The molded surface deforms around a screw | Overtightening, unsuitable hole preparation, incorrect washer seating, or lack of stable support. |
| The junction color looks inconsistent | Different color reference, surface finish, batch, or material exposure across the accessory set. |
HESU system note: A 3-way connector should be reviewed with the selected resin tile profile and roof geometry. Matching the junction as a system is more reliable than correcting several incompatible parts during installation.
3-way connector compared with related ridge parts
| Component | Roof position | System role |
|---|---|---|
| Ridge cap | Continuous horizontal roof peak | Covers the meeting line between two roof slopes. |
| Hip or sloping ridge tile | Diagonal external roof intersection | Continues the finish from the eave area toward the main ridge. |
| 3-соединитель конька крыши | One main ridge meeting two hip directions | Transitions three adjoining ridge lines at one molded junction. |
| 4-соединитель конька крыши | Central crossing of four sloping ridge directions | Finishes a four-direction roof intersection. |
| Ridge end or hip starter | Exposed beginning or end of a ridge run | Closes the terminal profile instead of joining multiple directions. |
FAQ about 3-way roof ridge connectors
What is a 3-way roof ridge connector?
A 3-way roof ridge connector is a molded roof accessory used where three ridge directions meet. In a typical hipped layout, it connects one horizontal main ridge with two diagonal hip or sloping ridge lines.
Is a 3-way connector the same as a normal ridge cap?
Нет. A normal ridge cap continues along one ridge line. A 3-way connector is a junction piece with three branches, so it must align with several adjoining ridge components at the same point.
Does every hipped roof need a 3-way ridge connector?
Нет. The roof drawing determines the component. A roof with a main ridge meeting two hips may use a 3-way connector, while a pyramidal roof with four hip directions may require a 4-way connector. Simpler roofs may need only ridge caps and end pieces.
Can a three-way ridge tile fit any synthetic resin roof tile?
Нет. Compatibility depends on the main tile profile, adjoining ridge and hip shapes, roof angles, overlap direction, поддержка макета, and fixing method. A similar color or appearance does not prove that the parts fit together.
Should the connector be forced into the roof angle?
Нет. Forcing the connector or pulling it down with fasteners can create distortion and uneven contact. Recheck the roof geometry, support height, component alignment, and selected profile before fastening. Any approved adjustment method must come from the product-specific installation guidance.
Does the connector make the roof junction waterproof?
The connector contributes to weather shedding, but it does not make the junction waterproof by itself. Performance depends on the complete roof assembly, including overlaps, поддерживает, крепежные детали, шайбы, closures or flashing where required, уклон крыши, and installation quality.
What is another name for a 3-way roof ridge connector?
Common names include three-way ridge tile, 3-коньковая плитка, Y-shaped ridge connector, and three-way ridge cap. The name alone does not confirm the geometry or tile profile, so the product image and roof drawing should also be checked.
Is the HESU connector shown here Y-shaped or T-shaped?
The photographed HESU connector is Y-shaped. It is intended for a junction with one main ridge and two hip directions. A T-shaped connector serves a different ridge relationship and should not be substituted without checking the roof geometry and compatible accessory profile.
Match the connector to the roof system
Send HESU the main tile model, adjoining ridge profile, junction drawing or clear roof photo, цвет, quantity and destination. Include the roof pitches where available so we can discuss the correct three-way connection with your project team.